📖 목차
들어가기 앞서서
백업에 대해 이야기해보자. 일반적으로 데이터 백업은 3-2-1 규칙으로 통한다. 하지만 이제 막 개인 서버(Home Server)에 입문한 사용자에게 있어서 이러한 3-2-1 규칙을 완벽하게 지키는 것은 비용적으로나 구성면에서 상당히 벅찬 일이다.
먼저 3-2-1 규칙 백업을 간단하게 알아보자.
3: 데이터는 최소 3개의 사본을 유지해야 한다.
- 원본 데이터 1개 + 백업 데이터 2개
2: 최소 2가지의 다른 저장 매체(Media)를 사용해야 한다.
- 컴퓨터의 로컬디스크(원본) + 외장하드/NAS/LTO Tape(백업)
- ⚠️ 주의: 레이드 1은 절대 백업이 아니다! 많은 사람들이 종종 오해하곤 하는데, 레이드 1은, RAID의 모든 방식은 어디까지나 서버 가용성을 위한 기술이다. 이를 백업처럼 믿고 사용하다가, 비슷한 시기에 생산된 디스크가 동시에 수명이 다해버리면(동일 주차 디스크 사망 이슈) 데이터 복구는 불가능해진다. RAID는 백업이 아님을 기억하자!
1: 최소 1개의 복사본은 물리적으로 분리된 곳에 보관해야 한다.
- 내 방/서버실 (원본) + 퍼블릭 클라우드/원격지 데이터센터(백업)
- 화재나 천재지변을 대비해 원격지에 데이터를 두거나, LTO 테이프를 별도 공간에 보관하는 것(Off-site)을 말한다.(AWS S3 Glacier가 이를 추상화하여 서비스로 제공하고 있는 것이다.)
하지만, 일반 사용자가 LTO 테이프 드라이브 고가장비(PTL)를 갖추는건 배보다 배꼽이 더 큰격이다. 물리적으로 다른 장소를 섭외하는 것도 쉽지 않다.
다행히 우리는 현재 클라우드 시대에 살고 있다. 복잡한 하드웨어 구성과 과한 비용 대신 Dropbox, Google Drive, OneDrive, iCloud Drive 같은 클라우드 스토리지 서비스를 통해 원격지 백업 공간으로 활용할 수 있다.1
하지만 여기서 새로운 문제가 발생한다. “내 소중한 개인 데이터를 남의 컴퓨터(클라우드)에 믿고 맡길 수 있는가?” 클라우드 공급자가 데이터를 분석 목적으로 열어보거나, 혹은 외부 해킹으로 계정이 탈취되었을 때 내 민감한 정보가 고스란히 유출될 위험이 존재한다.
그래서 이번 글에서는 Restic과 Rclone을 활용하여 이 문제를 해결해보고자 한다. 데이터를 강력하게 암호화(Restic)하여 본인만이 아는 비밀번호를 통해 아무도 열어볼 수 없게 만든 뒤, 다양한 클라우드 스토리지로 자동 전송(Rclone)하는 방법이다.
본 가이드는 Linux 기반의 개인 서버 사용자를 대상으로 작성되었습니다.
Restic 백업은 무엇일까?
Restic은 청크 방식으로 백업 대상을 레고 블럭과 같이 분리하여 데이터를 보관한다. 원본 데이터의 복구가 필요시 기존 특정 날짜나 특정시점의 데이터를 한치의 오차도 없이 레고 설계도를 보고 다시 조립하는 것과 같이 원본 파일을 복원해낸다.
또한, 기존 전통적인 백업 도구들의 모든 데이터를 그대로 백업하는 풀(Full)백업과 기존과의 차이점을 기록하는 증분(Incr.)백업과 다르게 중복 데이터 제거를 위해 단일 백업 풀(Pool)을 가지고 있다. 이러한 백업 방식과 달리 Restic은 처음 언급과 같이 백업 대상을 레고 조각처럼 분리하여 모든 데이터를 저장하고, 이후 설계도를 갱신하면서 차이점(증분)을 모아 계속 기록하고 백업데이터가 무너지지 않게(정합성) 전체 백업의 데이터 깨짐을 체크할 수 있는 옵션도 가지고 있다. 이를 통해 Restic은 적은 공간을 차지하여 데이터를 백업할 수 있다.
그리고 Restic은 기본적으로 암호화되어 데이터를 저장한다. 그래서 Restic은 키 값을 직접 입력하거나 환경 변수를 통해 키 값을 주입하여 백업 공간을 초기화하는 것이 필수이다. 이를 통해 클라우드 백업시 안전한 데이터 보관을 달성 할 수 있다.
⚠️ 주의: 데이터 정합성(Data Consistency)
Restic을 믿고 모든 데이터를 백업하고 안전하게 복구할 수 있으니 “이제 내 데이터는 무적이야!”라고 방심해서는 안된다. 그 앞에는 데이터 정합성이라는 최종보스가 문 앞을 지키고 있을 것이다. 이러한 정합성을 고려하지 않고 Restic을 통한 백업2은 복구 시점에 깨진 파일 조각을 가져와 곤혹스럽게 할 것이다.
왜 정합성 이슈가 발생하는걸까?
라이브로 돌아가고 있는 시스템을 어떻게 백업할 것인지 고민해보면 기존 백업 방식으로는 무언가 잘못될것 같지 않은가?
쉬운 예로, Docker로 서비스중인 컨테이너가 있다고 생각해보자. 컨테이너 내부는 nginx 웹서버나 MariaDB 같은 데이터베이스가 실시간으로 데이터를 쓰거나 로그를 갱신하고 있을 것이다. 이렇게 실시간으로 쉴 새 없이 변하는 파일시스템을 그대로 Restic으로 스냅샷을 만든다면?
백업이 진행되는 그 짧은 시간(수 초~수 분) 동안에도 데이터는 변경된다. 파일 앞부분은 10시 00분 01초의 상태인데, 뒷부부분은 10시 00분 05초의 상태가 저장될 수 있다. 당연히 백업된 데이터의 결과는 100% 데이터 불일치(Inconsistency)가 되어 복구했을때, 특히 DB의 경우 내부 데이터베이스가 깨져서 올라오지 않는 참사가 발생한다.
이를 완벽하게 해결하려면 다음과 같은 기술이 필요하다.
- LVM 스냅샷 – Linux LVM
- VSS(Volume Shadow Copy Service) – Windows
- Application Freeze (DB 덤프등)
하지만 이제 막 개인 서버를 구축한 입문자가 파일 시스템 레벨의 스냅샷이나 쉘 스크립트 훅(Hook)까지 핸들링하기에는 진입 장벽이 너무 높다.
Restic으로는 핫 데이터(Hot Data)가 아닌 콜드 데이터(Cold Data)를 백업하는 용도로 사용하자.
- Hot Data (비추천 ❌): 실시간으로 실행 중인 DB 파일, VM 이미지 파일, 실시간 컨테이너 이미지 등
- Cold Data (추천 ✅): 사진, 영상, 문서, 이미 완료된 프로젝트 파일, 설정 파일(Config), 혹은 mysqldump 등으로 1차 백업 된 아카이브 파일
Rclone은 무슨 역할을 할까?
Restic은 어디까지나 데이터를 잘게 쪼개고 암호화해서 준비하는 백업 도구이다. 물론 Restic 자체적으로도 SFTP나 AWS S3 등을 지원하지만, 세상에는 수많은 클라우드 스토리지가 존재한다. Rclone은 바로 이러한 스토리지에 저장을 하기위해 사용한다.
Rclone은 Restic이 암호화한 데이터 풀(Pool)을 받아 우리가 사용하는 Dropbox, Google Drive, OneDrive와 같은 저장소로 API 규격에 맞춰 안전하게 배달해주는 배달부이다.
이와 같은 조합을 통해 Restic(데이터 포장 및 암호화) + Rclone(클라우드로 배달)의 조합으로 자신이 사용하고 있는 클라우드를 암호화된 백업 저장소로 역할을 바꿔 사용할 수 있다!
그러면 본격적으로 Rclone으로 저장소를 구성해보자!
작업전 되도록이면 GUI 환경에서 SSH 클라이언트를 통해 서버에 접속하여 작업하자. 그렇지 않으면 토큰값을 서버에 전달할 방법을 찾아야하므로, 간단하게 작업하기 위해 추천한다.
Debian/Ubuntu 계열
sudo apt update
sudo apt install restic rclone -yRHEL/Rocky 계열 – EPEL 저장소 필요
sudo dnf install epel-release -y
sudo dnf install restic rclone -yRclone에 클라우드 계정 연결하기
이제 Rclone을 설정해보자.
linux@svr:~$ rclone config
2025/12/27 01:23:45 NOTICE: Config file "/home/user/.config/rclone/rclone.conf" not found - using defaults
No remotes found, make a new one?
n) New remote
s) Set configuration password
q) Quit config
n/s/q> n    # n을 입력해 새로운 remote 설정을 만들자.

Enter name for new remote.
name> gdrive    # 이름은 구분하기 쉽게 지어준다.

Option Storage.
Type of storage to configure.
Choose a number from below, or type in your own value.
 1 / 1Fichier
   \ (fichier)
 2 / Akamai NetStorage
   \ (netstorage)
 3 / Alias for an existing remote
   \ (alias)
 4 / Amazon Drive
   \ (amazon cloud drive)
 5 / Amazon S3 Compliant Storage Providers including AWS, Alibaba, Ceph, China Mobile, Cloudflare, ArvanCloud, Digital Ocean, Dreamhost, Huawei OBS, IBM COS, IDrive e2, IONOS Cloud, Lyve Cloud, Minio, Netease, RackCorp, Scaleway, SeaweedFS, StackPath, Storj, Tencent COS, Qiniu and Wasabi
   \ (s3)
 6 / Backblaze B2
   \ (b2)
 7 / Better checksums for other remotes
   \ (hasher)
 8 / Box
   \ (box)
 9 / Cache a remote
   \ (cache)
10 / Citrix Sharefile
   \ (sharefile)
11 / Combine several remotes into one
   \ (combine)
12 / Compress a remote
   \ (compress)
13 / Dropbox
   \ (dropbox)
14 / Encrypt/Decrypt a remote
   \ (crypt)
15 / Enterprise File Fabric
   \ (filefabric)
16 / FTP
   \ (ftp)
17 / Google Cloud Storage (this is not Google Drive)
   \ (google cloud storage)
18 / Google Drive
   \ (drive)
19 / Google Photos
   \ (google photos)
20 / HTTP
   \ (http)
21 / Hadoop distributed file system
   \ (hdfs)
22 / HiDrive
   \ (hidrive)
23 / In memory object storage system.
   \ (memory)
24 / Internet Archive
   \ (internetarchive)
25 / Jottacloud
   \ (jottacloud)
26 / Koofr, Digi Storage and other Koofr-compatible storage providers
   \ (koofr)
27 / Local Disk
   \ (local)
28 / Mail.ru Cloud
   \ (mailru)
29 / Microsoft Azure Blob Storage
   \ (azureblob)
30 / Microsoft OneDrive
   \ (onedrive)
31 / OpenDrive
   \ (opendrive)
32 / OpenStack Swift (Rackspace Cloud Files, Memset Memstore, OVH)
   \ (swift)
33 / Pcloud
   \ (pcloud)
34 / Put.io
   \ (putio)
35 / SMB / CIFS
   \ (smb)
36 / SSH/SFTP
   \ (sftp)
37 / Sia Decentralized Cloud
   \ (sia)
38 / Sugarsync
   \ (sugarsync)
39 / Transparently chunk/split large files
   \ (chunker)
40 / Union merges the contents of several upstream fs
   \ (union)
41 / Uptobox
   \ (uptobox)
42 / WebDAV
   \ (webdav)
43 / Yandex Disk
   \ (yandex)
44 / Zoho
   \ (zoho)
45 / premiumize.me
   \ (premiumizeme)
46 / seafile
   \ (seafile)
Storage> 18    # 위 리스트를 참조하여 연결할 서비스를 선택한다.(Google drive는 18이다. 17번은 GCP이므로 주의)

Option client_id.
Google Application Client Id
Setting your own is recommended.
See https://rclone.org/drive/#making-your-own-client-id for how to create your own.
If you leave this blank, it will use an internal key which is low performance.
Enter a value. Press Enter to leave empty.
client_id>      <mark style="background-color:rgba(0, 0, 0, 0);color:#0693e3" class="has-inline-color"><- 비워둔채 엔터를 입력한다.</mark>

Option client_secret.
OAuth Client Secret.
Leave blank normally.
Enter a value. Press Enter to leave empty.
client_secret>     <mark style="background-color:rgba(0, 0, 0, 0);color:#0693e3" class="has-inline-color"><- 비워둔채 엔터를 입력한다.</mark>

Option scope.
Scope that rclone should use when requesting access from drive.
Choose a number from below, or type in your own value.
Press Enter to leave empty.
 1 / Full access all files, excluding Application Data Folder.
   \ (drive)
 2 / Read-only access to file metadata and file contents.
   \ (drive.readonly)
   / Access to files created by rclone only.
 3 | These are visible in the drive website.
   | File authorization is revoked when the user deauthorizes the app.
   \ (drive.file)
   / Allows read and write access to the Application Data folder.
 4 | This is not visible in the drive website.
   \ (drive.appfolder)
   / Allows read-only access to file metadata but
 5 | does not allow any access to read or download file content.
   \ (drive.metadata.readonly)
scope> 1  # 1을 입력한다. (권한 설정이다.)

Option service_account_file.
Service Account Credentials JSON file path.
Leave blank normally.
Needed only if you want use SA instead of interactive login.
Leading `~` will be expanded in the file name as will environment variables such as `${RCLONE_CONFIG_DIR}`.
Enter a value. Press Enter to leave empty.
service_account_file>    # 비원두채 엔터를 입력한다. (서비스 계정 자격증명 파일을 등록하여 간단하게 연결하지만 서비스 계정 자격증명 파일 생성이 더 복잡하므로 원격지를 통해 토큰을 입력하기위해 비워두자)

Edit advanced config?
y) Yes
n) No (default)
y/n> n    # 고급 설정은 필요없으므로 n을 입력하자.

Use auto config?
 * Say Y if not sure
 * Say N if you are working on a remote or headless machine

y) Yes (default)
n) No
y/n> n   # 여기서 중요하다! n을 입력하여 우리는 이제 GUI 환경에서 토큰을 추출해야한다!

Option config_token.
For this to work, you will need rclone available on a machine that has
a web browser available.
For more help and alternate methods see: https://rclone.org/remote_setup/
Execute the following on the machine with the web browser (same rclone
version recommended):
        rclone authorize "drive" "{token}"
Then paste the result.
Enter a value.
config_token>여기까지 왔으면 이제 토큰을 얻어야할 차례이다.
CLI에서 나온 명령어인 rclone authorize “drive” “{token}” 을 이제 웹브라우저가 있는 GUI 환경에서 얻어야한다.
Windows에서 설치
Windows도 다른 Linux/macOS와 같이 터미널(Powershell/CMD)에서 winget 명령어로 빠르게 설치가 가능하다.(Windows 10 이상 요구)
winget install rclone.rclone

# 중요: 설치후 CMD나 PowerShell을 새로운 탭으로 켜거나 껏다 켜야한다.기본적으로 환경변수가 바로 갱신되지 않으므로 터미널을 재시작해서 다시 불러와야한다.

rclone authorize "drive" "서버에서_받은_긴_토큰"Linux에서 설치
설치방법은 서버에 설치하는 방법과 동일하다. 설치 후 다음 명령어를 입력하자
rclone authorize "drive" "서버에서_받은_긴_토큰"macOS에서 설치
user@Mac ~ % brew install rclone
user@Mac ~ % rclone authorize "drive" "서버에서_받은_긴_토큰"결과
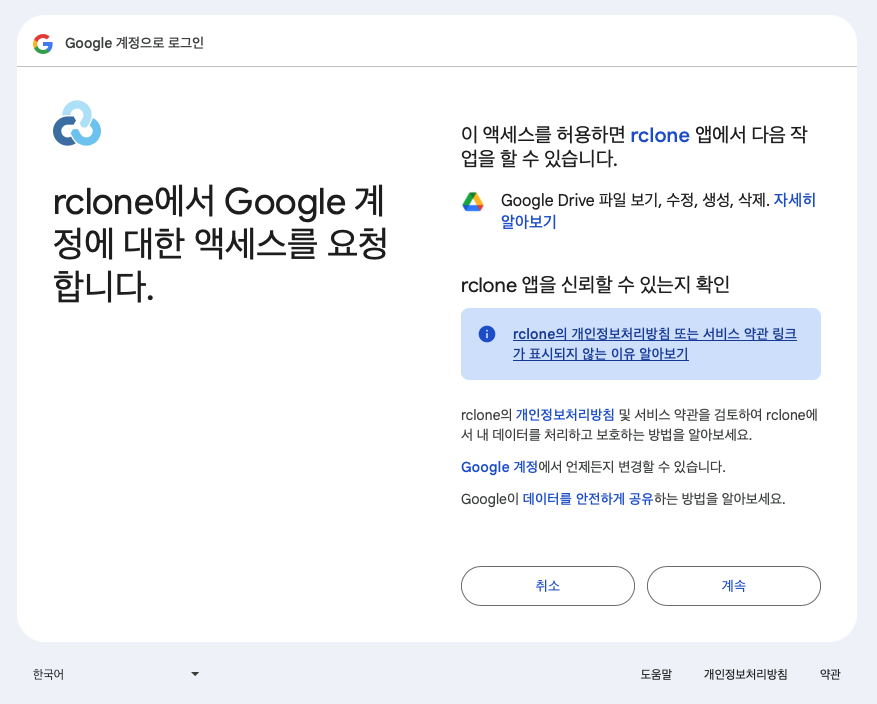
이와 같이 Google Drive(혹은 Dropbox나 OneDrive 등)로 접속할 수 있는 웹페이지가 나오고 진행을 완료하고 터미널을 보면 다음과 같이 키 값을 얻은 결과를 볼 수 있을 것이다.
NOTICE: Config file "/Users/user/.config/rclone/rclone.conf" not found - using defaults
NOTICE: Make sure your Redirect URL is set to "http://127.0.0.1:53682/" in your custom config.
NOTICE: If your browser doesn't open automatically go to the following link: http://127.0.0.1:53682/auth?state={token}
NOTICE: Log in and authorize rclone for access
NOTICE: Waiting for code...
NOTICE: Got code
Paste the following into your remote machine --->
{서버에_전달해야할_긴_토큰_문자열}
<---End paste이와 같이 얻은 문자열을 —> <—End paste 제외하고 복사하여 서버에 그대로 입력하여 전달하자.
config_token> {엄청나게 긴 token 복사 붙여넣기}

Configure this as a Shared Drive (Team Drive)?

y) Yes
n) No (default)
y/n> n    # n을 입력하자. 개인 드라이브인지 기업 혹은 학교와 같은 드라이브인지 구분하는 기능이다.

Configuration complete.
Options:
- type: drive
- scope: drive
- token: {"access_token":"{긴 토큰 데이터}","token_type":"Bearer","refresh_token":"{refresh token 데이터 영역}","expiry":"2025-12-27T01:23:45.12345+00:00","expires_in":1000}
- team_drive:
Keep this "gdrive" remote?
y) Yes this is OK (default)
e) Edit this remote
d) Delete this remote
y/e/d> y    # y을 입력해 설정을 저장하자.

Current remotes:

Name                 Type
====                 ====
gdrive               drive

e) Edit existing remote
n) New remote
d) Delete remote
r) Rename remote
c) Copy remote
s) Set configuration password
q) Quit config
e/n/d/r/c/s/q> q # q를 입력하여 설정을 종료하자. 여기까지 왔으면 설정은 다 끝났다.이렇게 완료하였으면 저장소 생성은 완료되었다. 이제 Restic을 통해 백업을 해보자.
Restic 저장소 초기화 (The Vault)
Rclone 설정을 마쳤다면, 이제 클라우드 스토리지의 본인이 선택한 플랜의 공간에 배달하기전 암호화된 금고를 만들 차례다. Restic은 Rclone을 백엔드로 사용할때 rclone:<Rclone설정_이름>:<버킷/폴더명> 형식을 사용한다.
다음과 같이 명령어를 입력하면 암호를 설정하는 내용이 나온다. 폴더명은 임의대로 설정해도 알아서 생성해주므로 적절하게 입력하자.
# 형식: restic -r rclone:<remote이름>:<폴더명> init
restic -r rclone:gdrive:backup_repo init

enter password for new repository:
enter password again:
created restic repository {repo_문자열} at rclone:gdrive:backup_repo

Please note that knowledge of your password is required to access
the repository. Losing your password means that your data is
irrecoverably lost.🚨경고: 여기서 설정하는 비밀번호는 당신의 데이터를 암호화하는 유일한 키이다. 이 비밀번호를 잃어버리면 적어도 미래의 양자컴퓨터 정도여야 복구가 가능하니, 반드시 안전한 곳에 기록해두자. 아니면 다음과 같은 방법을 통해 암호키를 하드코딩하는 방법도 있다.
# 형식: restic -r rclone:<remote이름>:<폴더명> init -p <키 위치>
restic -r rclone:gdrive:backup_repo init -p /etc/restic/pass.key

created restic repository {repo_문자열} at rclone:gdrive:backup_repo

Please note that knowledge of your password is required to access
the repository. Losing your password means that your data is
irrecoverably lost.이렇게 하드코딩된 파일의 경우 유출되지 않도록 적절한 권한 설정을 해주어야한다.
chmod 600 /etc/restic/pass.key대망의 첫 백업
클라우드 스토리지에 금고가 만들어졌으니, 이제 서버의 소중한 데이터를 집어넣을 시간이다. 테스트 삼아 홈 디렉터리(~) 전체를 백업해보자. 물론, 실제 운영 시에는 필요한 디렉터리만 지정하여 백업하자.
# 형식: restic -r rclone:<remote>:<폴더> backup <백업할_대상_경로>, 암호화 파일로 하드코딩한 경우 -p 옵션을 꼭 줘야한다!
restic -r rclone:gdrive:backup_repo backup ./test

enter password for repository:
repository {repo_이름} opened (version 2, compression level auto)
created new cache in /home/user/.cache/restic
found 1 old cache directories in /home/user/.cache/restic, run `restic cache --cleanup` to remove them
no parent snapshot found, will read all files
[0:00]          0 index files loaded

Files:           1 new,     0 changed,     0 unmodified
Dirs:            1 new,     0 changed,     0 unmodified
Added to the repository: 2.965 KiB (1.369 KiB stored)

processed 1 files, 2.219 KiB in 0:09
snapshot {repo_이름} saved백업 확인 및 검증
Restic에는 백업을 확인하는 명령어와 데이터가 깨지지 않았는지 검증하는 명령어가 있다.
백업 확인
# 형식: restic -r rclone:<remote>:<폴더> snapshots
restic -r rclone:gdrive:backup_repo snapshots

enter password for repository:
repository {repo_이름} opened (version 2, compression level auto)
found 1 old cache directories in /home/user/.cache/restic, run `restic cache --cleanup` to remove them
ID        Time                 Host        Tags        Paths
--------------------------------------------------------------------------
0000000  2025-12-27 01:23:45  svr                  /home/user/test
--------------------------------------------------------------------------
1 snapshots백업 검증
다음과 같은 명령어를 통해 백업한 풀(Pool)의 에러를 검증할 수 있으며, 에러 발생시 그 즉시 새로운 백업을 받아야한다!
# 형식: restic -r rclone:<remote>:<폴더> check
restic -r rclone:gdrive:backup_repo check

using temporary cache in /tmp/restic-check-cache-1000000000
enter password for repository:
repository {repo_이름} opened (version 2, compression level auto)
created new cache in /tmp/restic-check-cache-1000000000
create exclusive lock for repository
load indexes
[0:01] 100.00%  1 / 1 index files loaded
check all packs
check snapshots, trees and blobs
[0:02] 100.00%  1 / 1 snapshots
no errors were found마치며
이번 글은 Restic과 Rclone의 연계에 집중하여 설명하다보니 Restic을 제어하는 방법이나 cron과 같은 자동화 도구를 이용해 자동으로 백업을 전달하거나, 백업 보관 주기를 설정하는 방법을 이야기하지 못한게 아쉽다. 이러한 부족한 내용은 추후 Restic만을 이야기하는 글을 작성하도록 하겠다.
아무튼 이렇게 우리는 3-2-1 백업 규칙 중 개인 사용자가 시도하기 어려웠던 물리적으로 분리된(Off-site)에 데이터를 보관하는 방법을 무료 도구를 통해 달성하였다.
비싼 LTO 테이프 드라이브나 복잡한 서버실 계약 없이도, Restic의 강력한 암호화와 Rclone의 유연한 연결을 통해 기업급의 백업 안정성을 확보한 셈이다. 이러한 기술의 진보는 결국 요즘 트렌드인 클라우드에 맞물려 B2B뿐만이 아닌 B2C로서도 제 몫을 톡톡히 하는 케이스 예시로 볼 수 있겠다.
마지막으로 데이터는 잃어버리기 전까지 항상 그곳에 존재하겠거니 하지만, 어느 순간 랜섬웨어나 하드웨어 고장으로 파괴된 데이터를 본 글을 통해 미리 대비하여 복구할 수 있는 기회가 되길 바란다.